
Aaaand Today, We Preeeeesent

The Ruby Nation
Some stories are so strong that they barely need artwork. Ruby Nation falls into this category. An in depth and emotionally moving dystopian story exploring what it is to be human is told by Neil Kapit, and can be found here.
The Rating
So, for this comic I'd like to do something rather different; the story and the art on this comic seem so separate that I'd like to rate them as such, with an overall rating.
The Story

Powerful, moving and well paced, the story of Ruby Nation is one I'd REALLY like to read.
The Artwork

Unfortunately, you have to get past the art to get to the story....and that's a bit of an issue.
The Overall

The Raves
In terms of web savvy, the creator of The Ruby Nation has it down. Social media, check. Site design, check. Networking, check. They're also a powerful storyteller, with relatable dramas and real suffering set in a dystopian atmosphere. If it had been a novel, I would have loved reading The Ruby Nation.
The Razzes
I'll be honest, the art. The art is rather like a bowling ball dropped on that lovely story souffle. If I were the creator, I'd put Ruby Nation together as a script and go looking for an artist who can do this wonderful story justice. But if they're set on becoming an artist and they've got the drive to improve, here are my thoughts, condensed into a series of lessons.
The Ringmaster's Lessons: An Improvement Course For The Comic Artist
Month One
- Read at least 3 comic strips a day; I recommend 5. Find comics you love and study their style. Absorb the art. This will train your eye and your instinct for art.
- Read the book Understanding Comics by Scott McCloud. The lessons in this book are golden, and even ideas that seem simple and boring at first will improve your sense of comic craft. You'll fall in love with the facial muscle and expression chapter
- Start back at basics. Every day, spend half an hour sketching basic stuff; a chair, a shoe, a plant, ect. Once a week when you have time, line up things of these four categories: smooth, spiky, furry, tufted. I recommend an egg, a plant with lots of leaves, a scrubbing brush/tooth brush and a hair brush. Do studies of each object, then of all four together. Change the lighting on them if you can to keep things interesting
- Go to the park or somewhere busy at least once a week and sketch. Everything. Anything. People, plants, squirrels, benches, LIFE. This helps to train your eye and your hand. Don't worry about finishing the sketches, just SKETCH.
Month Two
- Get a copy of a really good anatomy book. I recommend either Joseph Sheppard's 'Anatomy: A Complete Guide For Artists' or Bridgman's 'Complete Guide To Drawing From Life'. Go through one chapter each week, and sketch that part of the body all week until you can do it in your sleep.
- Every day, go to Posemaniacs.com and do a few of their 30 Second Sketches
- Don't stop going to the park and sketching life. This isn't about making finished art, it's about teaching your eye and hand what the world REALLY looks like.
- Read Scott McCloud's book Understanding Comics to gain a deeper understanding of your artform
- Read The Bean's great article on What Makes A Webcomic Work; click here.

Month Three
- Begin learning to use reference photos. Google something in the Images search, like 'throwing baseball' and search through the images till you spot something that really POPS, that draws your eyes. Save that image, and do a sketch based on it. Start with simple stuff in the first week; picking a flower, lifting a box, ect. Then work up to whole human and animal bodies in week two. In week three, do architecture; a house, a bridge, the Eiffel Tower. In week 4, do street scenes and city scenes. REPEAT.
- Read Get Rid of On The Nose Dialogue; click here.
- Don't stop using the exercises from Month One and Two
- DO NOT STOP DRAWING. PRACTICE WITHOUT CEASE!!! You only improve by CONSTANT PRACTICE.
Month Four
- Begin using reference photos as aids to lay out your panels. Use them to choose where to put speech bubbles. It's okay for now if this seems like a crutch; the purpose of a crutch is to help you until you can walk on your own.
- Start taking some of your sketches and turning them into finished works. Experiment with lines and shade
- Take the page from Scott McCloud's 'Making Comics' on facial expressions and draw your main comic characters showing each of these expressions. Do it again and again till you're happy with it.
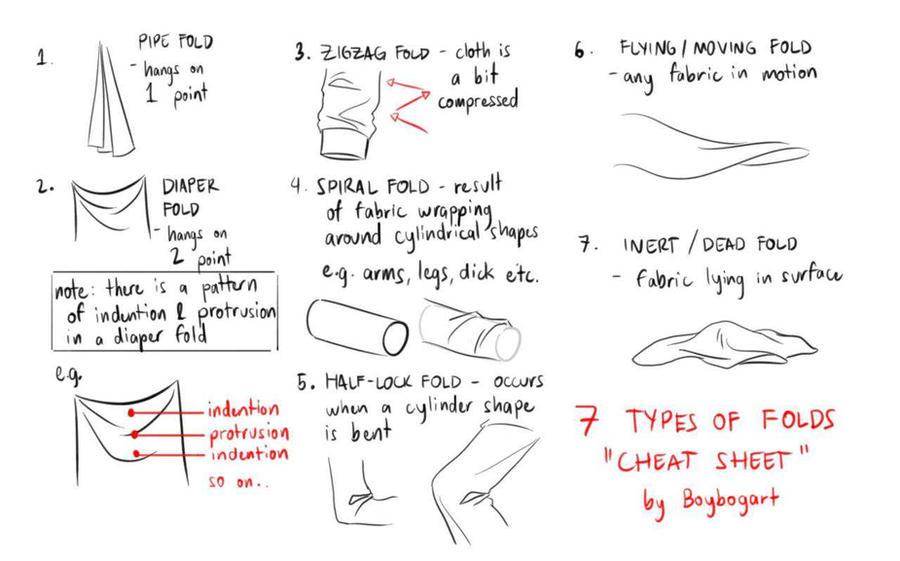
- Get several different kinds of clothes hung on hangers, and draw the textures of the cloth. Focus on drawing the folds. Here's a great cheat sheet to get you started.
- Go through some of these great tutorials I've got in a google doc to continue improving your drawing style
Months Five And Six And Beyond
- Relaunch your comic if you've stopped.
- Study the following resources in order
- The Biggest Mistakes People Make When They Start A Webcomic
- Comic Survival Kit
- The great course Get A Grasp MOOC, which you can find right here
No comments :
Post a Comment
Drop us a line!