
 Hurry, Hurry Hurry! Come See The Monthly Matinee!
This Month, The Art Of Pinning Down Sound!


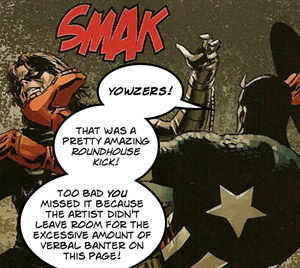
Is This Your Reaction To Comic Lettering?
If it is, don't worry! You're certainly not alone! Lettering is, to many comic creators, an arcane art. It's a vile beast that makes finely wrought art look amateurish. It's an awful process that reduces you to tears on a regular basis, right?
But Wait!
But Wait!
Lettering isn't evil! In fact, it can be your best friend! Lettering is to comics what camera work is to the movies. It is, in effect, the difference between looking like a pro and an amateur. Good art can be ruined by bad lettering, and a early-career art can come off much more professionally with good lettering.
I'm a sufferer of this myself. In working on the comic Parmeshen, I finally got good enough to realize how bad I was at lettering. So I did a bit of research, and found some tricks and a compendium of resources that will improve your lettering from day one.
I'm a sufferer of this myself. In working on the comic Parmeshen, I finally got good enough to realize how bad I was at lettering. So I did a bit of research, and found some tricks and a compendium of resources that will improve your lettering from day one.
*Note: All works used or quoted in this piece are referenced at the bottom of the page...except the bunnies in top hats.*

Trick Number One: Setting The Stage
When creating a comic, people often think in pictures and add the words in later.
STOP. RIGHT. NOW.
Why?Because art and lettering in comics can't be treated as separate entities. They're halves of a symbiotic whole, and the lettering should be as carefully and artistically arranged as the imagery to create a beautiful whole.
What I'm saying here in overly flowery terms is this: lay out your speech bubbles as you go. And lay them out well. You don't want this:
 |
| One of Chris Oatley's examples of WHAT NOT TO DO |
For example, here are the three stages of layout I use in my own work on the comic Parmeshen. (excuse the character presently residing in the bucket. He's had a bad day.)
 Step One: dialogue is laid out over the reference photos I intend to use for the piece. I give the words about twice as much space as I actually intend to leave them as I place them over the images, ensuring that they have the breathing space to be easily legible when the work is finished.The reference photos are then hidden beneath a white layer that I'll draw on, leaving a clean slate and my dialogue laid out where it belongs.
 Step Two:the images and figures are drawn AROUND the words, ensuring that neither element gets in the others' way.
Step Three: Art can continue with the assurance that the dialogue is going to fit just fine. This is an especially useful trick on pages thick with dialogue; often I find in Step One that such talkative pages will need more panels than I thought.
If you really cannot stand to stare at text as you work, try creating a separate text layer or sheet of onion skin paper for those carrying on the proud tradition of hand lettering, lay the verbage out and hide that layer, referencing it when you need to be sure your spacing is what it needs to be to fit both your witty banter and your art.

As Oatley writes, " The first two panels have a lot of wasted space within the word balloon because the text is not broken into a shape that fits naturally within the balloon. The third panel successfully implements the football formation."
Oatley also reminds us to leave the text room to breathe. Text should, unless there's a stylistic reason for it, NEVER EVER touch the bubble wall! In fact, the bubble ought to have a clear space between the text and the wall at every point. This lets the reader's eye avoid confusion or the feeling that the words have been an afterthought.
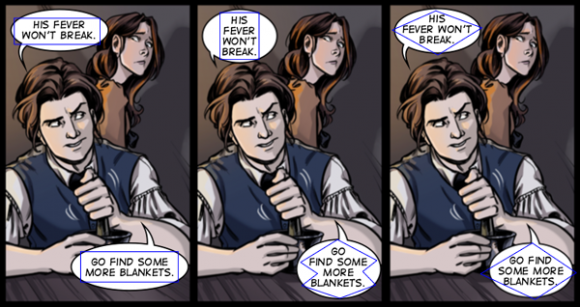
That's not to say that clever things can't be done with style in thought and speech bubbles. For instance, you can give the feeling of someone who's anxiously talking and thinking by one long, run-on sentence bubble. Bubbles can overlap one another to show that one speaker has interrupted another. There's no end to what you can do, and a great discussion of all that style can be found on Blambot. But first and foremost, make it LEGIBLE. If readers have trouble reading what you're saying, you've already lost them. Also, think about your fonts veeeerry carefully. A scary dripping-blood font is fine, even great for a sound effect, but don't make it part of the dialogue. Here's an example from an otherwise beautiful comic that I adore, Root And Branch:

Trick Number Three: Deceive The Eye, Cast The Story Spell
So now that you've placed your art and imagery perfectly in your panel, you have to do the next panel. And that opens up a whole new box of trouble.
Many creators make mistakes in dialogue and panel flow when they're beginning (I definitely count myself in this category) and it immediately separates the creative beginners and the pros. To pitch your creative work a little closer to the 'pro' camp than the 'amateur', here's something to remember: the point is to trick the human eye into reading, in lines and text, the impression of movement and the passage of time. Here are some tricks to create that illusion.

 Getting a sense that something's wrong? That's because you're being forced as a reader to read by context who's said what instead of relaxing into a familiar pattern of 'what is on the left is first'. This is really disconcerting for a reader! Your dialogue shouldn't confuse the eye, and neither should your layout. The layout should flow naturally from panel to panel, not forcing the eye to hunt for the next moment.

It's much better to keep the eye moving seamlessly from image to image, keeping up the illusion of movement. Forcing your readers' eyes to falter and your readers' minds to work to follow the story flow breaks the spell you're trying to weave around them. You can encourage this impression by the direction the characters are moving, looking, pointing ect. but the main pressure is on the dialogue to move in a clear and seamless pattern. Keep the lettering and layout of your dialogue readable, logical and easy to follow, and you're half way to great comic art!
See? Lettering isn't so bad after all!

Comic Book Grammar & Tradition by Nate Piekos An absolute Aladdin's cave of style, grammar and aesthetic traditions of comic making. I WISH I'd had this on hand as a baby creator, it would have helped my style so much!
*Comic Layout Tutorial: The Comic Lettering Spell Chris Oatley writes in clear, insightful and eminently usable terms about good and bad layout and lettering. He's an inspiration!
* Comic Layout Tutorial: Comic Balloons & Clarity Another great and witty Oatley article that's a must read
Wikipedia Glossary Of Comics Terminology Gutters? Tiers? Encapsulation? Your guide next time you get to talking layout with the pros.
*Balloon Shape From Comic Tools a great read on just how shape affects readability
Comic Composition, Layout And Flow a solid discussion with good visuals of laying out a readable and dynamic comic.
*Medli20's A Note On Comic Layout a great collection of image-heavy tutorials on layout via Deviantart

Trick Number Two: Changing Shape
Now that we've talked a bit about space around the word balloon, let's talk about space inside the balloon. Most of a letterer's mistakes happen right there, and they include
 |
| Another great example of what NOT to do, from Comictools.com |
To avoid these mishaps, remember the Flawless Diamond. Try to lay your words out in a diamond shape. Chris Oatley is, again, the perfect example of this. Take a look:
 |
| A nervous scene from the lovely comic 'Les Normaux' |
Oatley also reminds us to leave the text room to breathe. Text should, unless there's a stylistic reason for it, NEVER EVER touch the bubble wall! In fact, the bubble ought to have a clear space between the text and the wall at every point. This lets the reader's eye avoid confusion or the feeling that the words have been an afterthought.
That's not to say that clever things can't be done with style in thought and speech bubbles. For instance, you can give the feeling of someone who's anxiously talking and thinking by one long, run-on sentence bubble. Bubbles can overlap one another to show that one speaker has interrupted another. There's no end to what you can do, and a great discussion of all that style can be found on Blambot. But first and foremost, make it LEGIBLE. If readers have trouble reading what you're saying, you've already lost them. Also, think about your fonts veeeerry carefully. A scary dripping-blood font is fine, even great for a sound effect, but don't make it part of the dialogue. Here's an example from an otherwise beautiful comic that I adore, Root And Branch:
The art is stunning, but the font makes the reader squint! Don't do this. Dialogue fonts should be clear, legible, and easy to scan. They can be cool, but they're worse than useless if they're hard to read. In life and art, style needs to take shotgun and sense needs to drive.
Trick Number Three: Deceive The Eye, Cast The Story Spell

Many creators make mistakes in dialogue and panel flow when they're beginning (I definitely count myself in this category) and it immediately separates the creative beginners and the pros. To pitch your creative work a little closer to the 'pro' camp than the 'amateur', here's something to remember: the point is to trick the human eye into reading, in lines and text, the impression of movement and the passage of time. Here are some tricks to create that illusion.
Right To Left. Left To Right. Up To Down. No Exceptions!

In the West, we're trained to read left to right. In the East, it's right to left. Either is fine. But stick. With. ONE! If you're writing for a Western audience, they'll expect to see dialogue flow in a specific way. If you confuse their eyes, chances are they'll grow annoyed and give up reading your work. It can be a subtle mistake, like this:
 Getting a sense that something's wrong? That's because you're being forced as a reader to read by context who's said what instead of relaxing into a familiar pattern of 'what is on the left is first'. This is really disconcerting for a reader! Your dialogue shouldn't confuse the eye, and neither should your layout. The layout should flow naturally from panel to panel, not forcing the eye to hunt for the next moment.
It's much better to keep the eye moving seamlessly from image to image, keeping up the illusion of movement. Forcing your readers' eyes to falter and your readers' minds to work to follow the story flow breaks the spell you're trying to weave around them. You can encourage this impression by the direction the characters are moving, looking, pointing ect. but the main pressure is on the dialogue to move in a clear and seamless pattern. Keep the lettering and layout of your dialogue readable, logical and easy to follow, and you're half way to great comic art!
See? Lettering isn't so bad after all!

A Little Bag Of Tricks
Below is a short list, in order of usefulness, of lettering and general layout tips and tricks. Articles marked with asterisks were referenced in this blog and thoroughly enjoyed.
Comic Book Grammar & Tradition by Nate Piekos An absolute Aladdin's cave of style, grammar and aesthetic traditions of comic making. I WISH I'd had this on hand as a baby creator, it would have helped my style so much!
*Comic Layout Tutorial: The Comic Lettering Spell Chris Oatley writes in clear, insightful and eminently usable terms about good and bad layout and lettering. He's an inspiration!
* Comic Layout Tutorial: Comic Balloons & Clarity Another great and witty Oatley article that's a must read
Wikipedia Glossary Of Comics Terminology Gutters? Tiers? Encapsulation? Your guide next time you get to talking layout with the pros.
*Balloon Shape From Comic Tools a great read on just how shape affects readability
Comic Composition, Layout And Flow a solid discussion with good visuals of laying out a readable and dynamic comic.
*Medli20's A Note On Comic Layout a great collection of image-heavy tutorials on layout via Deviantart
A Tip Of The Hat
Thanks to Knightjj of Les Normaux and Pink of Root And Branch for letting me use their work as examples, both works deserve a read! And if you'd like to take a look at my own artistic stumbles, wander over to Parmeshen.
No comments :
Post a Comment
Drop us a line!